Now that your WordPress site is up and running it’s time to create a contact form to allow your visitors to communicate with you through your email directly and safely.
Maybe you are contemplating displaying your email address on your contact page directly, or you are confused about which is the best choice.
We shall look at how you can add a contact form to your WordPress (wordpress.org) site using three of the most popular plugins.
The contact form has some benefits over the direct display of email addresses as suggested below.
Why Use Contact Form
- Spam Protection – You will avoid the display of your email address on the website if you have a contact form, hence getting rid of nearly all spam emails.
- Integration – Contact forms allow you to integrate data collected from your visitors into other automated services such as email sequences, and broadcasts. You can integrate contacts using your email marketing tools such as ConvertKit or Mailchimp, or CRMs platforms like Jetpack.
- Effective communication – You can request the user to leave the exact information that you need (such as their phone number, address e.t.c.) using a contact form, which will reduce the back and forth communication. You can also filter the kind of communication you get from your form. The contact form is available all the time so your visitors can always communicate with you. You can use forms to inform your clients about the expected response time so as to get rid of numerous emails from restless clients.
- Add Professional Touch ‒ Make your website look more of an expert and appealing by having a contact form inside, and increase your reader’s trust
Install plugin Best free tools to use
While there are numerous plugins that you can use to add a contact form we shall consider three of the most popular plugins; Contact Form 7, Ninja Forms and WPForms
There are many other tools available out there and all you need is to identify one and learn how to use it.
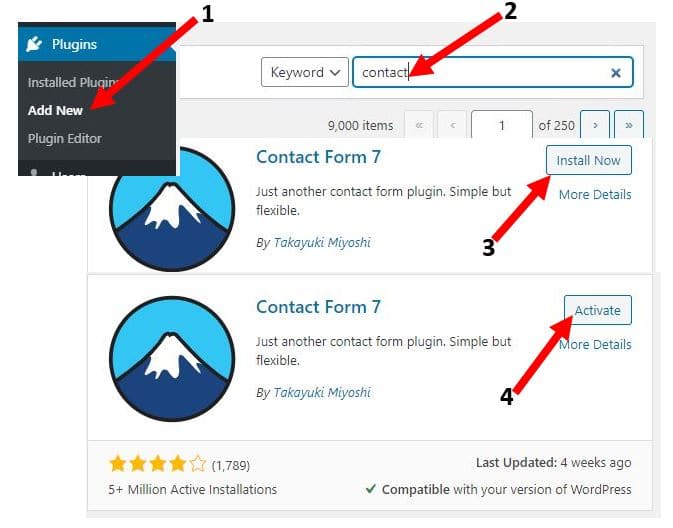
Before you start creating the first form you need to install the plugin of your choice on your WordPress site.
- To install your plugin, open your wordprocessor dashboard and point to plugins and click Add New.
- Type the name of the plugin you want to add and search for it.
- Click install now and then
- Click activate after installation is complete.
1) Using Contact Form 7
From your WordPress dashboard, you can access all the functionalities of contact form 7 from the Contact menu.
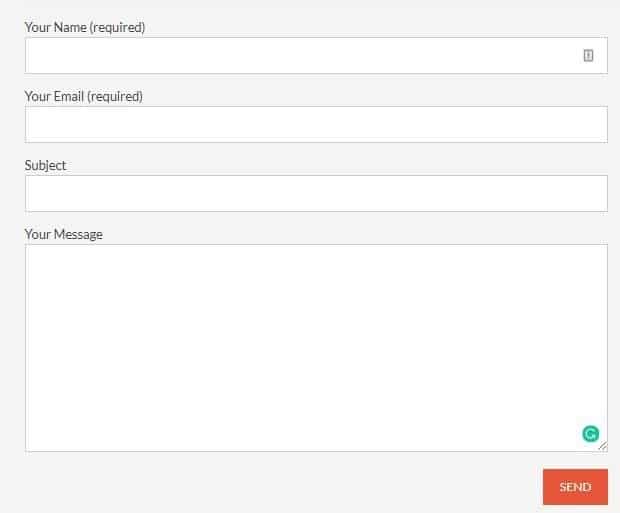
By default, you will find one contact form ready to be added to your post or page. It’s a basic form with four fields i.e. Name, Email, Email Subject, and Message. If that is all you need in your form then skip and go to the next section where you will add the form to your page, otherwise continue reading.

a) Create New Form / Edit Existing Form – using Contact Form 7
Contact Form 7 main disadvantage is the fact that it’s not user-friendly when adding forms or making changes since you need to use tags instead of the drag and drop used by competitors. To create a new form click on the Add New button at the top of the page.
Start by adding the form title and then proceed to edit the existing template.
To add extra fields to meet your site’s needs, you can select the appropriate tag-generator button to generate the correct form tag.
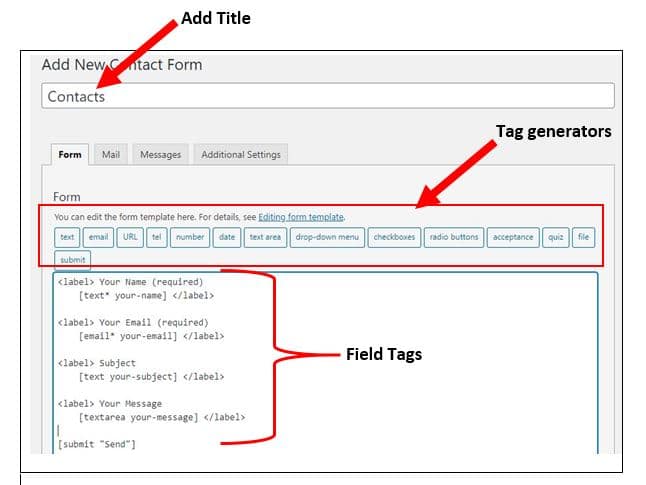
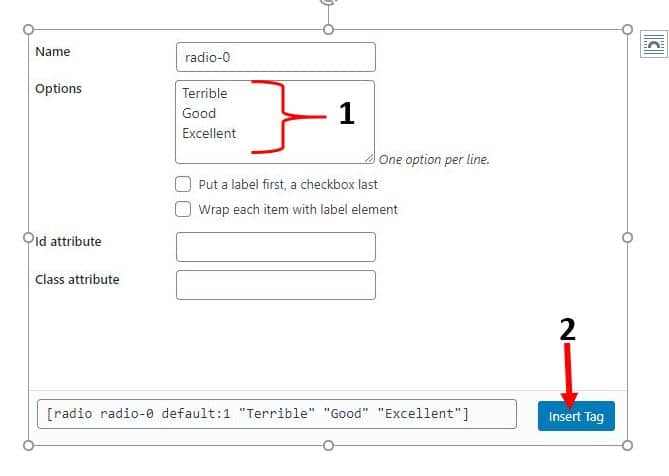
For example, if you need to add a multi-option field, you can use either checkboxes or radio buttons. Click on the radio button and add the multiple options to select from, and then click Add Tag. The following options are available;
- Name – Enter the name to assign your tag which is not visible to the site visitors.
- Options – Enter the different options for your tag to be viewed by the user.
- Id and Class attribute – This is meant for additional Custom styling of your form.
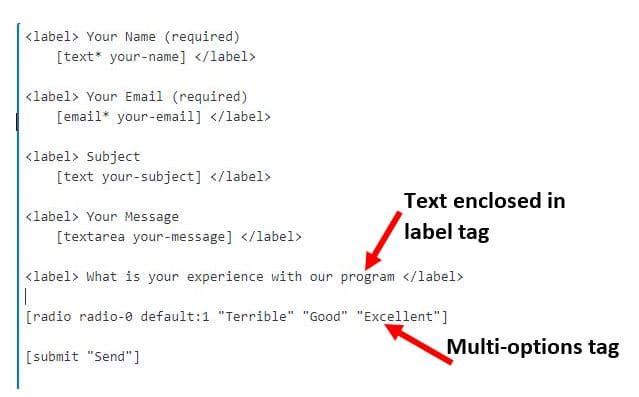
Since you have the options to select from it’s now time to add the label which will hold the question or statement for the user to understand what the options are all about. Here we shall enclose the necessary text inside label tags, and we are done.
Continue adding as many tags as needed for your website and then click Save.
b) Email Template Setting
Click on the mail button at the top to make adjustments to emails. You can edit email templates for the email that you will receive from the visitors who use your form to contact you. Several options are available including the message body, email subject, and header fields, or can even use HTML in a message if needed.
Ensure you have added all the new tags that you used to customise your form in the email template so as to see the result.
Using email 2 you can also make adjustments to the email template for a second email which is used as an autoresponder email.
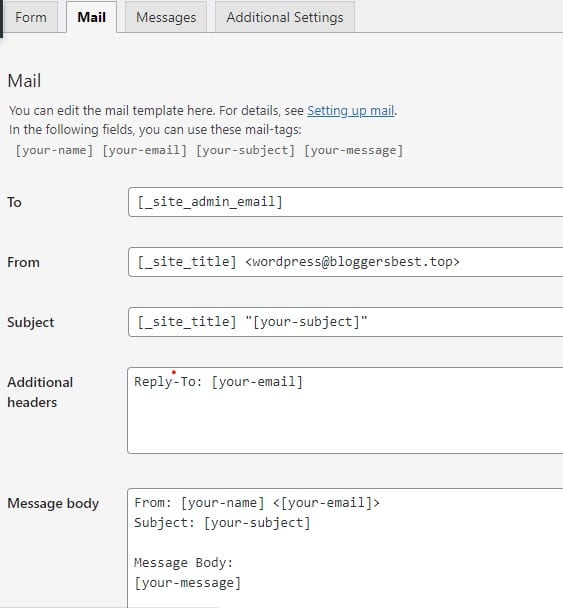
The following can be edited as follows;
To field – Set the recipient email address here, with the help of mail tags.
From field- Set the sender email address here using mail-tags as well.
This field value should be an email address that belongs to the same domain as the website. Otherwise, you’ll get a configuration error.
Subject field- Set the subject of the message here using mail tags.
Additional headers – You can insert additional message header fields here, such as Reply to, Cc and Bcc. There should be one field per line. You can embed mail tags anywhere in these fields.
Message body- This is the message body that allows you to embed mail tags anywhere in this field.
If you select the Exclude lines with blank mail-tags from the output checkbox, lines including mail-tags that have empty values will be excluded from the message body of the actual email output.
By default, plain text is used for the message body. To use HTML, select the Use HTML content type checkbox.
File attachments- If you attach uploaded files to this email, put mail tags for the uploaded files here. You can also attach files from the server (local file attachment).
Mail (2)- This is an additional mail template often used as an autoresponder, but you can use it for any purpose. Mail (2) is sent only when the primary Mail has been sent successfully.
Don’t forget to save it after you finish editing
c) Message Editing
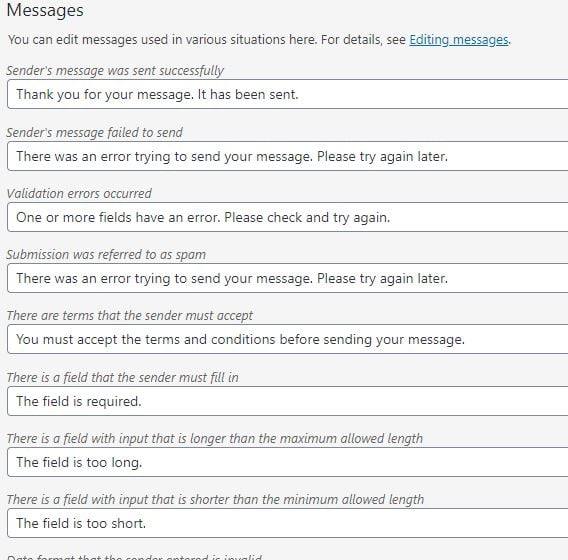
This is where you edit the user-friendly messages that will appear to the user in the process of interacting with the form. All the messages have been set but you can always customize them to suit your website better.
d) Additional Settings
This setting allows you to add more functionality to your form such as
Subscribers only – You may want to ensure that only logged-in users can submit your contact form. This is a good way of minimizing spam in your inbox
Demo mode – The contact form will skip the process of sending mail and other associated functionality such as storing messages with flamingo and just display “completed successfully” as a response message.
Skipping mail – contact form will skip the process of sending mail and just display “completed successfully” as a response message, but does not affect flamingo functions.
Flamingo settings – You can customize the values associated with flamingo plugin services including suppressing message storage.
And other settings.
2) Using Ninja Forms
To start working with Ninja Forms plugin after installation, click the Ninja Forms menu from your WordPress dashboard.
Ninja also has a default form created with the minimum required four fields i.e. Name, Email and Message. If this is all that you need for your contact form then you can just skip to the Adding form to a page section.
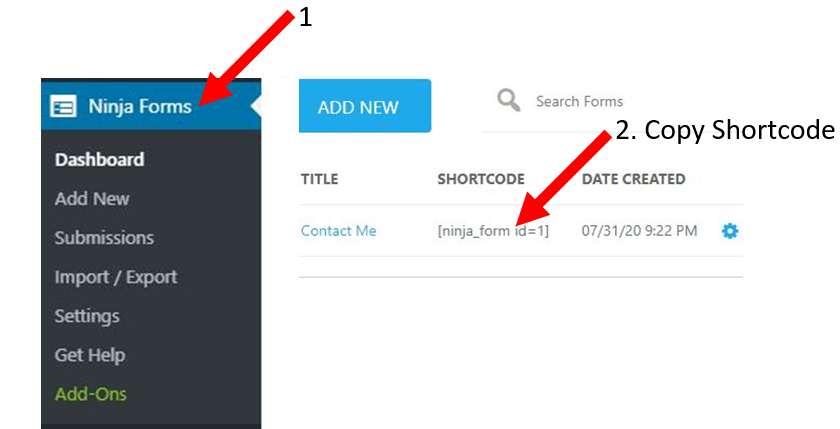
Otherwise, if you may wish to edit or add a new form follow the following steps.
a) Create New Form / Edit Existing Form – using Ninja Forms
Click Add New to start a new form or the existing form to edit.
You will be met with nine templates to select from. It’s worth noting that not all templates are ready to use since some may require additional plugins to work at a fee.
Once you have identified and opened the right template for you, you will see the edit page with the sample fields. We shall use a basic Contact Me template and try to add the radio buttons field just like in the previous case.
Under the Form Fields button, you can add a new field just click on the blue + (plus) button at the lower right corner of your screen.
This is where the main difference between Ninja Forms and Contact Form 7 comes in.
All you need to do is to drag the radio list button to the white space in the exact location you want it to appear. No need for tags here.
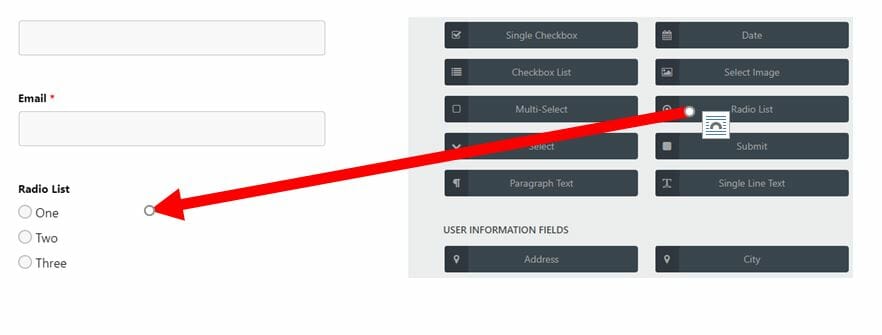
Click on the newly added files and the right menu changes to allow you to edit the following fields.
- Label – This is where you type the label for the new field that will help the readers understand the purpose of the radio buttons
- Required field – Select whether its a must for the user to fill this field before sending the form
- Options – Set the content of the radio list to select from
- Display – You can use this feature to add more additional text to elaborate the label, a hyperlink or even an image.
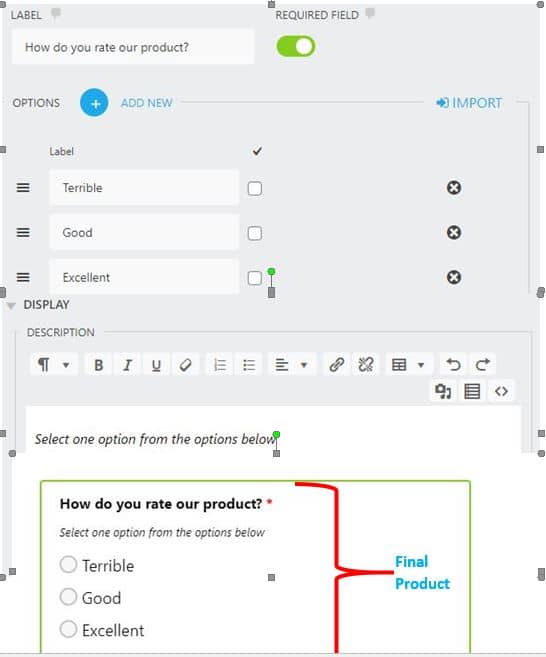
Don’t forget to hit Done to see the effect on the preview. Continue adding fields as you edit until you have the required form for your site, then click Publish
b) Email Notifications and Confirmation Settings
Click the Emails & Actions button to make the necessary changes in your emails settings such as
Action Name – The name that will appear in your actions list
To – The email address this action will send to. You can type an email address manually, or use the “merge tag” icon to add a field from the form (such as the user’s email) to send the message to. Additional email addresses can be added with a comma separator.
Reply-To – If your recipient clicks “reply” from this email message, most email clients will automatically send the reply to the email address specified here instead of the “FROM ADDRESS.”
Email Subject – Set the subject for the email
Email Message – Create the body of your email. If you do not place content here, a blank email message will arrive in the recipient’s inbox.
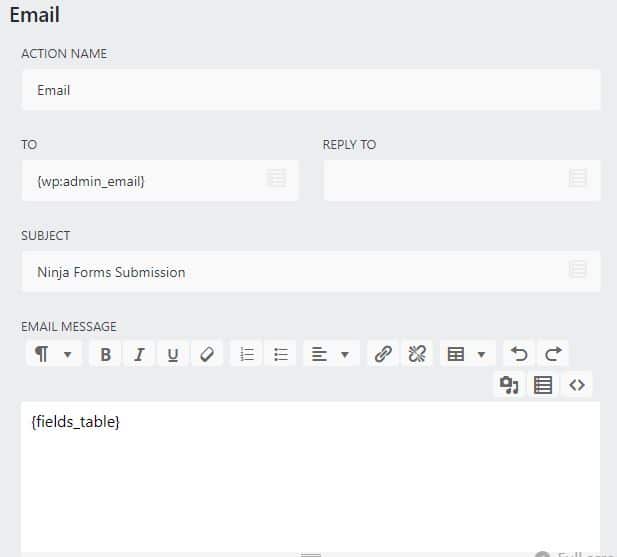
You can get more details on Ninja Form email notification settings here
c) Advanced settings
From the Advanced button and Display Settings, you can add some advanced settings such as
- Form Title – Name of the form used for both display and administrative purposes.
Display Form Title – Toggle to show/hide form title when displayed on the page. This may be important to disable if you are going to add your form to a page that contains another title. - Clear Successfully Completed Form – Toggle this option to clear submitted values from the form after the processing task has been completed successfully.
- Hide Successfully Completed Form – Toggle this option to completely hide the form after the processing task has been completed successfully.
- Custom labels – Use this option to add more custom labels to fields
From the Restrictions buttons, you can set some conditions to protect your site from spam messages such as
- Unique Field – You can set one field to be unique to prevent a single user from making multiple entries. May be important in registration forms.
- Logged In – Use it to restrict the use of the form to users who are logged in only or all users.
- Limit Submissions – Use this option to limit the number of times a single user can submit the feedback using that form. This might be useful if the Unique condition was not set.
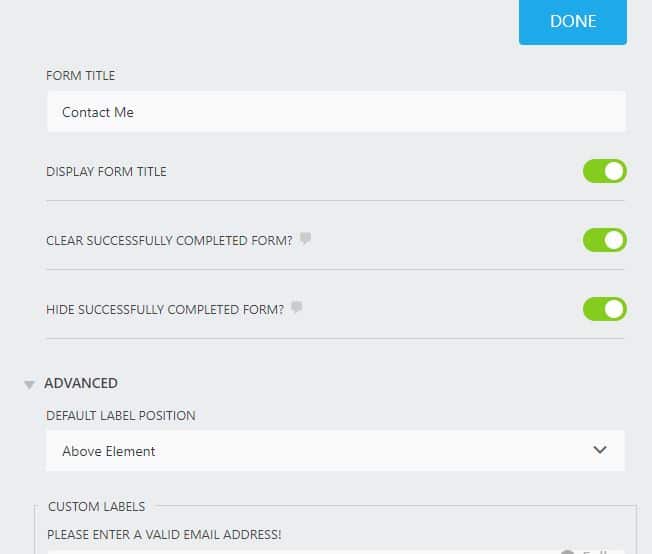
Learn more about advanced tab details from this page
Don’t forget to click Publish to save changes once you are thorough with the settings.
You can also enable developer mode at any stage of the editing form for more advanced features.
One major problem that I encountered with Ninja forms is the lack of scroll buttons on some screens where you have to use the arrow keys to scroll. e.g. When selecting forms templates and on the dashboard when you have many forms.
3) Using WPForms
WPForms is similar to Ninja Forms since it uses the drag and drag method to create fields but its pro version is cheaper than the Ninja Forms pro version.
For our review, we shall cover the free version only referred to as WPForms Lite.
WPForms is the only one of the three plugins that do not have a default form created when starting. You have to create one yourself.
Unlike Ninja Forms, WPForms has only 4 form templates that you can use in its free version. The rest are available only in the pro version.
WPForm has only ten field options to add to your new form as a free user, unlike the Ninja Forms which has more than twenty-six fields.
Click Add New from the WPForms button on your dashboard. You will get a new screen with five buttons to allow you to add and edit your form as follows.
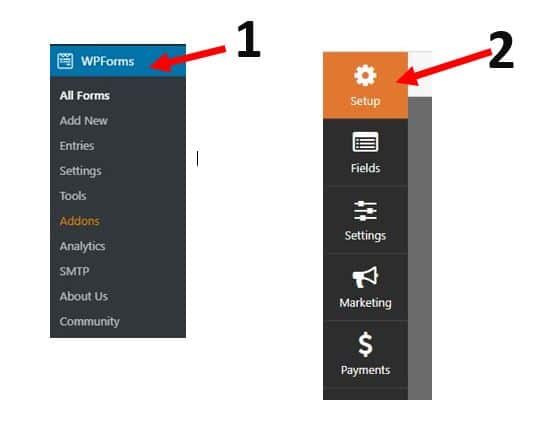
Setup – This is where you can select your template for your form. 4 templates are really available though you can add more from the Form Templates Pack addon.
Fields – This is where you can add your fields and manage the Fields Options such as Field label, Format, Description, Required, and others
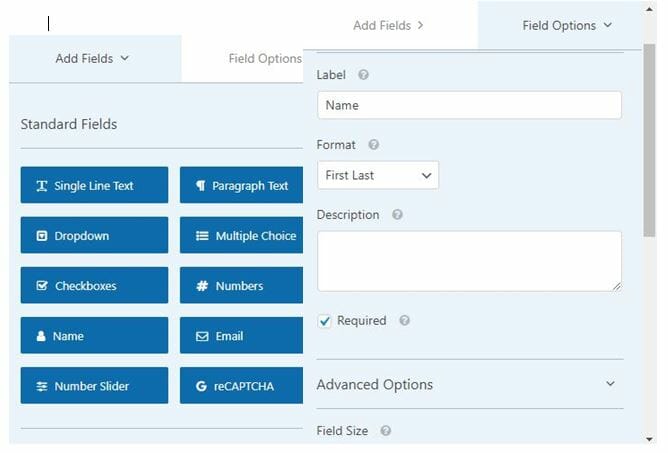
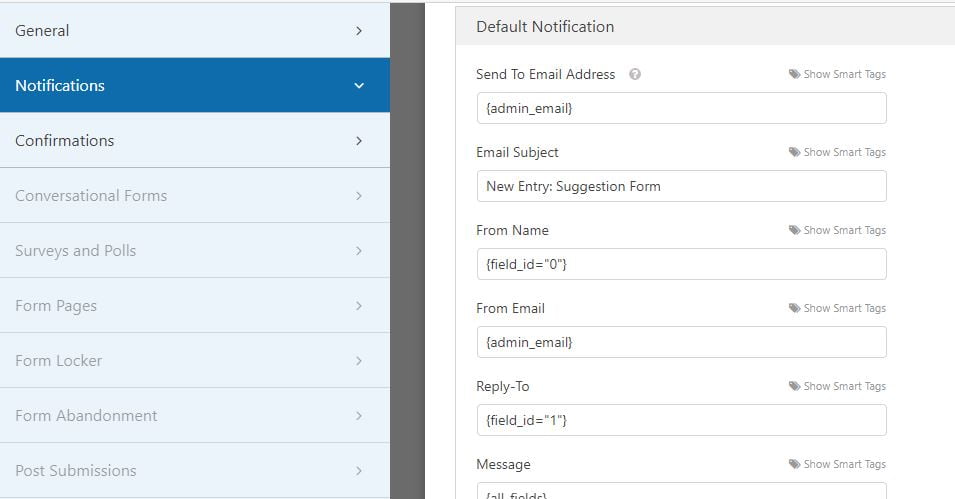
Settings – This is where you can set the email notifications settings which include
Sent to email address, email subject, from name, from email, Reply to, and Message among others.
Email Confirmations, and other General Settings. Most of these settings have the same meaning as the others we covered earlier.
There are other settings for the pro version.
Marketing and Integrations are largely for pro versions although the constant contact integration seems enabled even for free users.
Don’t forget to click Save when you are through with the settings.
Integrating form in WordPress Page
1) Adding Form to a page
Now that you have your beautiful form ready, it’s time to add it to your WordPress site pages.
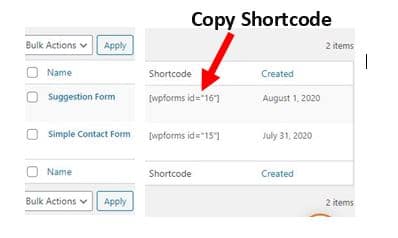
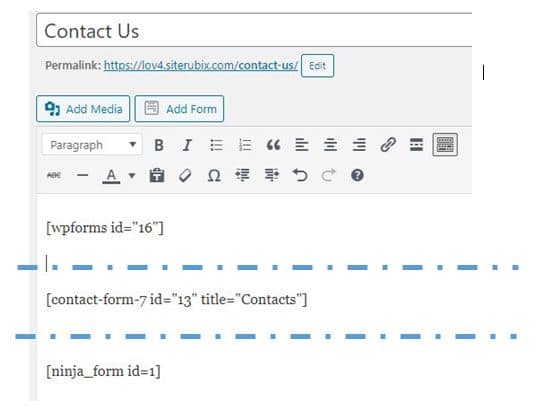
The first method and common method for all the three plugins is to copy the shortcode from any of the new forms that you have created, and then paste it into your contact us page, as shown below.
Click preview to view your page
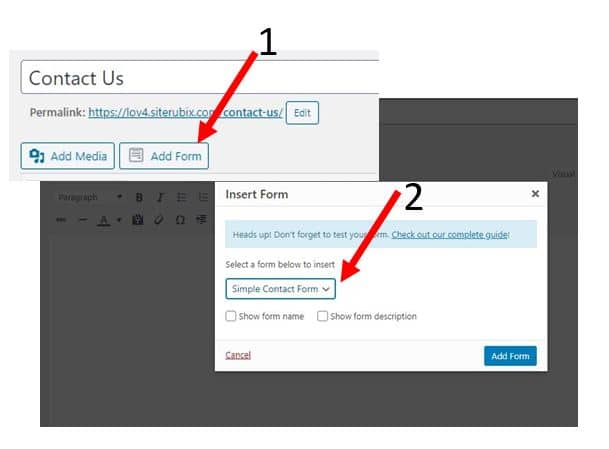
The second method is only available for WPForms and Ninja Forms. This is where you can add your form by clicking the Add Form button from the toolbar of the page and then selecting the form you wish to add. The shortcode will be added automatically to the page. When using the WPForms you can as well select whether to show form name and form description, which is not available in Ninja forms.
2) Adding Form to a Widget
If you need to view your form at the site sidebar or footer then you will need to add it through widgets.
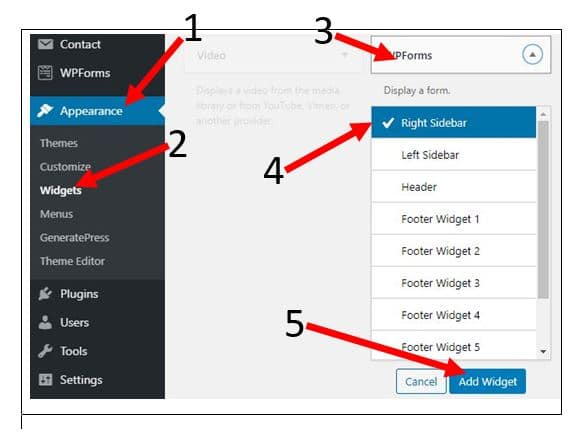
From your WordPress dashboard, click Appearance and then the widget button.
Locate your plugin contact form widget and click. Select the location to add your widget and click add Widget.
Integration
One of the most important reasons why you should add a contact form to your website is to be able to integrate your contact form with your email marketing services providers such as Constant Contact, MailChimp or ConvertKit.
You can also integrate your form to CRM, Paypal, Woocomerce, and Zapier amongst other available services.
Most of the integrations are offered in the paid versions of the contact forms plugins.
However, I noticed that Constant Contact is offered for the WPForms lite and is really available for integration in the Contact Form 7, But only available for the paid version for Ninja Forms.
Another email marketing platform, ConvertKit has direct integration with Contact Form 7 but is only available for paid versions of Ninja and WPForms.
Read a more comprehensive ConvertKit review here
Final thoughts on Contact Forms
Contact forms’ importance cannot be overemphasized. All you need to do is to identify one available plugin that can work for you and then add it to your site.
We have covered the use of the three most popular contact form plugins, however, there are other plugins out there such as Gravity Forms, Fluent Forms and JetPack Forms which offer their own set of products.
Ensure you can integrate your forms with ease to other necessary services.
Which is your favourite contact form plugin and why?
Feel free to leave your comment and suggestions.


